

Did you know that changing your domain name server (DNS) will improve your internet speed and make your internet searches more private and secure?
Until recently, I overlooked the DNS that my internet devices use. I imagine you might be in a similar boat.
Although your device’s DNS is a setting that is “invisible” to you, it can increase your internet speed and make your searches both more secure and more private.
By the end of this post you will understand:
- The benefits of changing your DNS on your internet devices
- What the most popular public DNS are
- How to determine what DNS is best for you
- How to change your DNS settings to improve your internet security, privacy, and internet browsing speed
DNS background information
If domain name servers are new to you, I recommend you check out our previous post: How does a DNS query work?
Reading our post about DNS queries will provide you with all you need to know about DNS and the steps involved in the domain name resolution process.
Recursive DNS recap
To refresh your memory, your recursive DNS is the domain name server that acts on your behalf to get the IP addresses of the internet sites you want to access.
Whenever you enter a fully qualified domain name (FQDN) for a website into your browser’s search bar, your recursive DNS will take that request and find the location for it on the web.
Once the site location is found, your recursive DNS provides it to your browser, and your browser reaches out to that location with a request for the website you searched for. In response, the server at the identified IP address sends your browser the website you want.
Now that you have the background information you need, let’s dive in and talk about your situation as it pertains to DNS.
What DNS am I using now?
By default, most internet devices will have the recursive DNS set to be automatically assigned. What this means is that your recursive DNS is most likely provided by your Internet Service Provider, or ISP (e.g. AT&T, Verizon, etc.).
If this is the case, there is no reason to fret. I’m sure your internet performs just fine using the DNS that your ISP has automatically assigned.
With that said, you can do better.
Actually, you should do better.
There are much better public DNS that you can use, and it is a free and easy change to make.
How can I improve my DNS?
The benefits of using a public DNS that is different from your automatically assigned DNS come down to three categories: performance, security, and privacy.
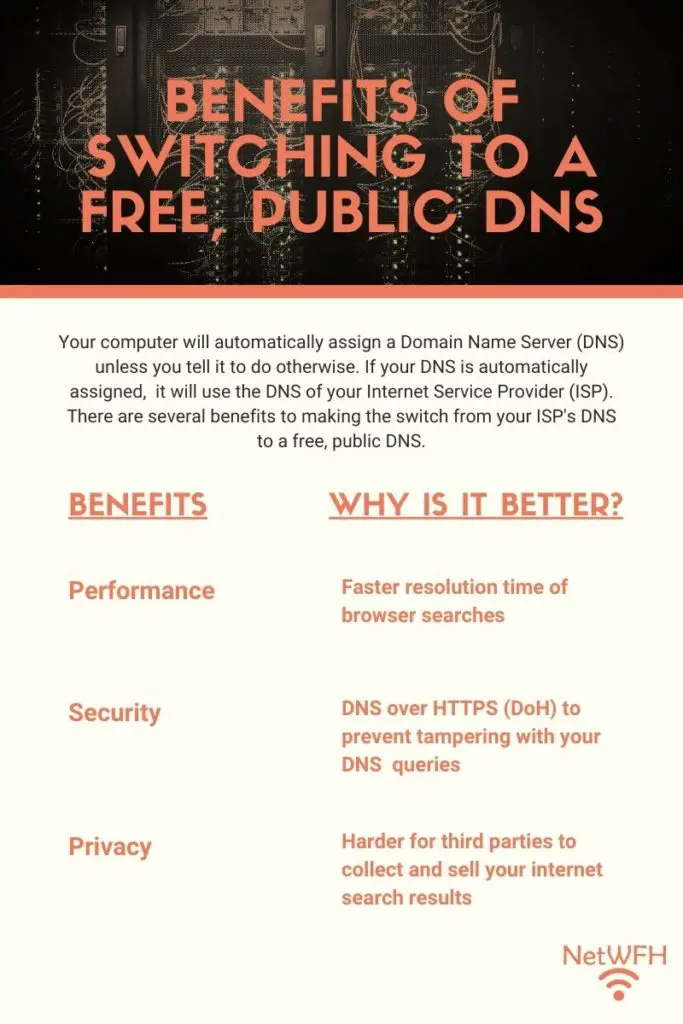
DNS performance
By changing your DNS to something other than what your ISP provides, you can actually improve your internet search speed.
The problem with a DNS that is provided by your ISP is that they are often slow and can be outdated. Combine that with the fact that there may be thousands of people using the same DNS at one time (other subscribers of the same ISP in your area) and you can see how they may get bogged down and congested.
Another item to pay attention to is that an ISP DNS is assigned to you regardless of your geographic location.
Huh? Why is your location important?
Importance of DNS location
When you make an internet request, it is sent to your recursive DNS over high speed wires. I’m sure it is not surprising to hear that the closer this recursive DNS is to you, the faster your internet search will be. By performing a test of public DNS options, you can most likely find one that is located closer to you (and less congested).
So yes, changing your DNS will likely improve your internet speed.
DNS security
Another benefit of using a DNS other than the one that your ISP provides is that you can choose one that is more secure.
There are several companies that provide DNS offerings focused on their user’s security.
How can your DNS security be enhanced?
For one, DNS can help protect you from malicious websites that contain viruses and other harmful content. If a website is known to be harmful and you try to access that page, you will be taken to a different page with a warning saying the site you tried to access is not safe. This process is called DNS filtering.
Your DNS safety can also be enhanced by a public DNS through a development called DNS over HTTPS (DoH).
What is DoH?
First and foremost, I am not talking about Homer Simpson here.
DNS over HTTPS is a protocol that is used to encrypt your DNS searches. It is used for communication between your computer’s browser and your DNS.
This basically means that your browser and DNS are the only two things that can read your DNS requests, regardless of who else may be listening in. To anyone else trying to see what websites you are going to, they will see scrambled characters that are useless to them.
How does DoH affect my internet security?
DoH makes your DNS searches more secure by preventing hackers from changing them.
This is best explained in an example.
Say you wanted to access network-from-home.com. Your laptop would send a request to your recursive DNS asking for the IP address of network-from-home.com.
Seems normal enough right?
What if a hacker was able to intercept your DNS request and rather than send you the IP address for network-from-home.com, he or she sends your browser to the location of a fake site?
What if this fake site looked identical to the one you wanted but contained a virus that you computer downloaded when you visited it?
Your computer would access the bad site and download the virus. If the hacker is skilled enough, you might not even notice the difference.
Yeah, this is not good.
Here is a visual example of this scenario:
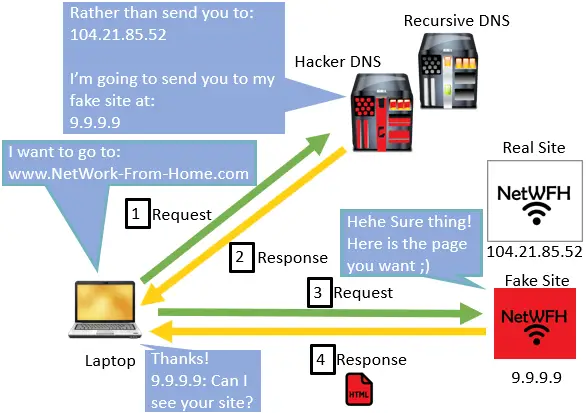
The good news is with DoH enabled on both your browser and DNS, you can prevent the above situation from happening. If the hacker can’t read the information sent between your computer and DNS, they will not be able to intercept and alter your requests.
Although this change will not make a noticeable impact on your internet searches, it should give you peace of mind because they will be more secure.
DNS search privacy
Every time you make a DNS request to search for a website’s location without using DoH, the site you are looking for is not secret. In other words, that part of your search is unencrypted. Even if you are using a secure browsing protocol like HTTPS (instead of HTTP), this information is still sent in plain text.
What does that mean in terms of privacy?
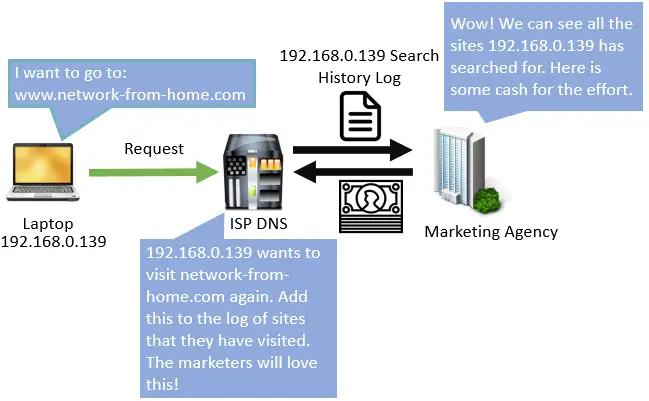
It means that your ISP can see and track every website that you search for. This is also true when you use other WiFi networks in places like airports or coffee shops; whoever is operating that public network can see every site that you access. They may not be able to see the contents of your searches and the information you enter into those sites, but they can see that you accessed them.
Why is this a privacy issue?
Well for one, your ISP can build a profile of all the sites you have accessed. This information is very valuable to advertisers and other third-party companies trying to sell you things. Your ISP will sell your information to these companies and make a profit off of your data.
Would you want other people looking at all the things you searched for on the internet?
Neither would I.
Thankfully DNS over HTTPS (DoH) has you covered in this regard as well. I must caveat this by saying your ISP may still be able to track your internet searches through other methods, but this at least makes it harder on them.
At the very least, any other third-party trying to listen in on your internet searches will be out of luck.
How does DoH make my DNS searches more private?
By encrypting the contents of your DNS requests over an HTTPs connection, DoH hides your requests from your ISP. In addition, DoH cuts down on the information that is sent to other DNS when trying to find the location of a website. By only providing the information that is relevant to each particular DNS, it makes it even more difficult to log the sites you visit.
In summary, DoH makes your internet searches much more private than they have been in the past.
I can’t imagine why you wouldn’t want something like this.
Do all public DNS use DoH?
Unfortunately there is a catch.
Due to the fact that DoH is still relatively new, not every public DNS supports it.
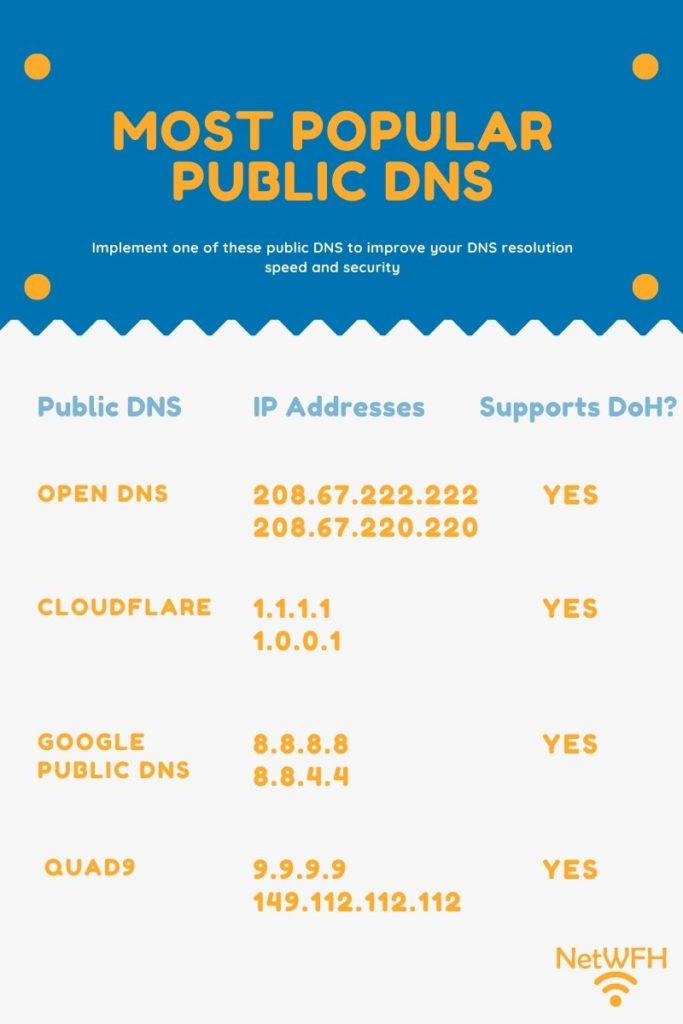
A few of the most popular public DNS that support DoH are as follows:
- Google Public DNS
- Cloudflare
- OpenDNS
- Quad9
In addition, DNS over HTTPS will only work if both your web browser and DNS support it. This is due to the fact that DoH uses an encrypted connection between your browser and DNS. If they both don’t support it, you will not be able to create the encrypted connection required.
As of today Google Chrome, Microsoft Edge, and Mozilla Firefox browsers support DoH.
What is the best DNS for me?
The good news is there are tools to make it easy to find which DNS will work best for you.
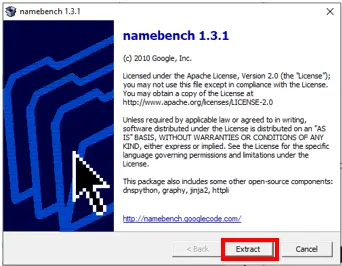
There are several tools out there, but the one I used is called NameBench. NameBench is a tool that can be used on Windows or Mac OS. It automatically tests popular DNS servers for you and gives you performance statistics on each. Based upon the results from the test, you can decide which DNS you want to choose.
You can download NameBench here. If you are using Windows you will want to choose the .exe download at the top of the list. For Mac OS you will want to choose the most recent .dmg file.
Setting up the NameBench DNS test
Once the file downloads, open the .exe (or .dmg if you are on a Mac OS) file and click Extract:
Once the extraction is complete, a new window will open. On this window you do not need to change any settings. You can simply click Start benchmark:
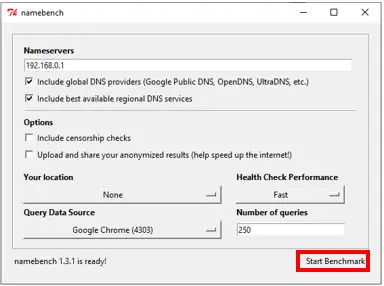
This will start your DNS test. The test will include the performance of your current DNS that is assigned by your ISP. You can tell by the 192.168.0.1 in the Nameservers entry. This means the test will use the DNS that your router tells it to. If your DNS has been automatically assigned, this will be your ISP’s DNS.
The test can take 10 minutes or so because it tests a handful of different DNS for response times. The NameBench window will indicate the status of the test at the bottom of the window.

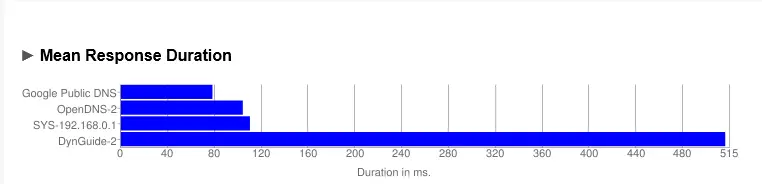
When the test has completed, you will get a summary of the mean response duration from the fastest DNS:
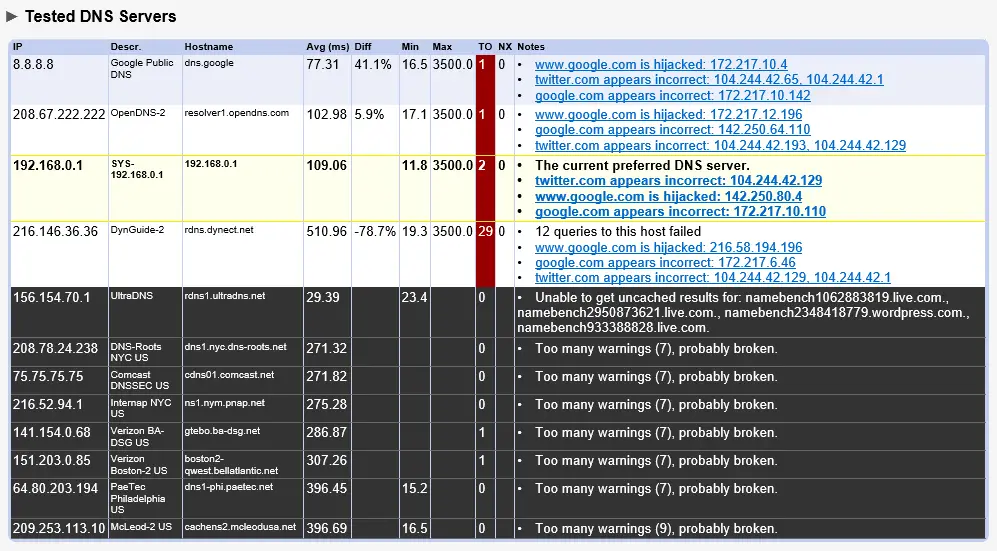
You will also receive a summary of the DNS tested:
What does all this mean?
For one, looking at the mean response duration you can tell that there are faster DNS than the one I am currently using (the ISP’s). Remember that the DNS I am using is listed as 192.168.0.1 which is the DNS assigned by my router. Looking at the DNS summary statistics in the Diff column, it looks like Google Public DNS is 41.1% faster than my current DNS.
That is significantly faster.
These results got me excited. One thing I did notice in the results, however, was that there were other popular public DNS that were not included in this test.
How to test other DNS with NameBench
The good news is that NameBench allows you to manually input other DNS to include in the DNS test.
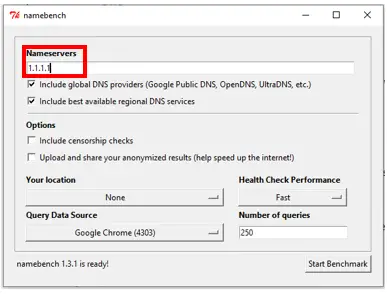
You can do this by entering the IP address of the other DNS you want to test. In this case, I wanted to test Cloudflare’s DNS because they have a good reputation from both a speed and security standpoint.
All I had to do was enter the IP address of Cloudflare’s DNS (1.1.1.1) into the Nameservers entry field in NameBench and run the test.
After running the test with Cloudflare’s DNS included, here are the results I got:

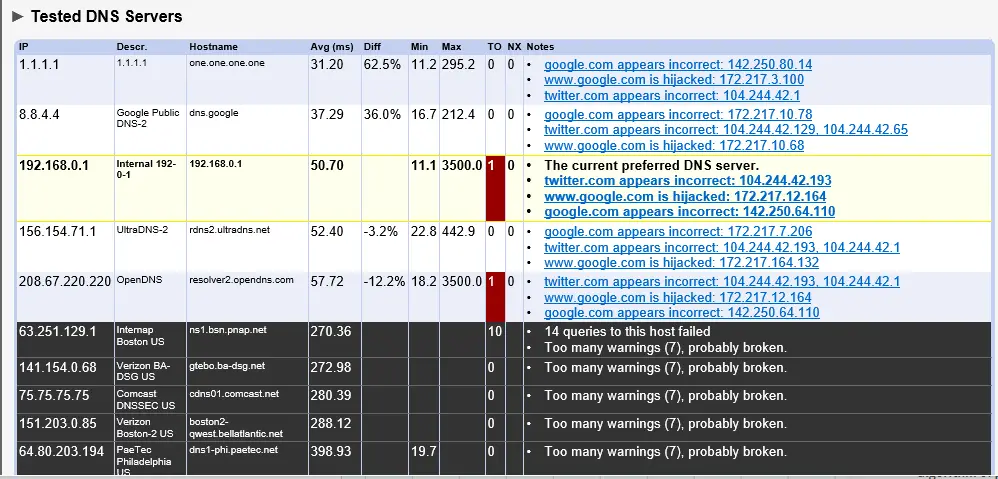
Cloudflare’s DNS is 62.5% faster than my current DNS server! At this point I was really starting to like the results of these tests.
Although my DNS test resulted in Cloudflare’s DNS being the fastest, your results might be different.
As a reminder, a factor in the speed of a particular DNS will depend upon how close you are to it. There may be other DNS that are closer to you that will result in faster resolution times.
Other DNS considerations
It can be very easy to select a public DNS that provides the fastest speed, but I urge you to consider the security aspect of your DNS as well.
In my case I was lucky because Cloudflare was the fastest DNS I tested but they are also very focused on security. On their website they promise to clear any logs of your DNS searches within 24 hours. This is another reason for me to go with Cloudflare, because I have their promise that they are not selling my DNS search data. This is a level of comfort I don’t have when I use my ISP’s DNS.
I say all this to recommend that you choose a DNS that supports DoH. That way, you will have a faster DNS that also provides you with more privacy and security.
Here is a list of the most popular public DNS that you should test with NameBench:
How to change DNS settings on your router
Ok at this point you have determined which DNS you want to use.
What next?
On your home network, you will want to change the DNS on your router.
Why change the DNS on your router?
This makes it easier for you. By changing the DNS on your router, all the devices on your home network will use the new DNS. Most of the time these devices will be connecting to the internet on your home network, and some of them will only connect through your home network (think Smart TVs, desktop computers, etc.)
To put it simply, your router will tell all the devices on your network to use the new DNS. You will not have to go onto each individual device and change the DNS settings. You may want to do that on your laptop and mobile devices, but we will get to that later.
Steps for changing your router’s DNS
In order to change the DNS of your router, you will first need to log into it. For many people you can do this by entering 192.168.0.1 into your search browser. You will then be prompted to enter the username and password for your router.
You will often find a sticker on your router detailing the address you can enter into your browser to change your router settings.
Upon logging into your router, you will need to find the advanced internet settings page.
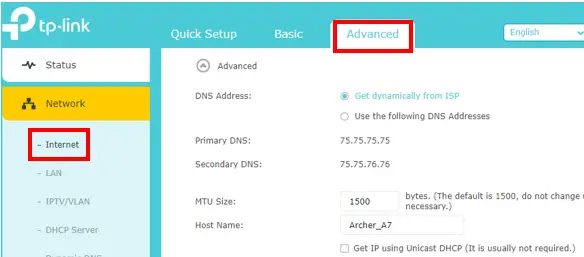
Here you can see that the Primary and Secondary DNS fields show the currently assigned DNS. I have a TP-Link router so your settings menu may look completely different than mine. That being said, there should be similar options for you.
From this window I can select “Use the following DNS addresses”. You can enter the primary and secondary IP addresses of the DNS you want (in my case Cloudflare’s).
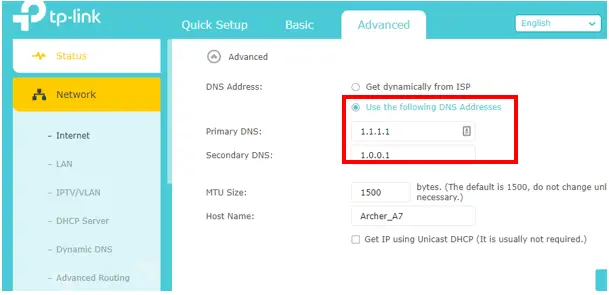
After making these changes I suggest you reboot your router.
Nice work, you have improved the internet experience for all your home devices. Every time you are connected to your home network, you will now be using the new DNS you chose.
How to change the DNS settings of your mobile devices
Unfortunately, changing the DNS on your router does not account for all the times you connect to the internet.
Think about the devices you take with you away from your home network.
I’m talking about your cellphone and laptop computer to name a few.
When these devices connect to an internet network other than your home network, they will use the DNS that the router of that network tells them to. In many cases, this will be the ISP’s DNS. Which means you will be open to someone tampering with your DNS searches or selling your search data to marketers.
You can get around this by changing the DNS on the device itself. This will overrule what DNS the router tells your device to use.
If you change the DNS on your device itself, no matter what internet network you are connected to, you will always use the free and public DNS that you like. This ensures your DNS searches are always secure, even when you are away from home.
How to change your laptop’s DNS
I will show you how to change your DNS using Windows 10. If you have a Mac, there are many other sites available showing how to change your DNS.
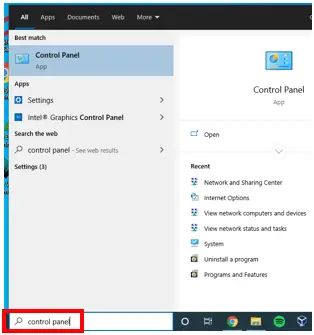
To change the DNS on your Windows 10 device, first you need to open the Control Panel. You can do this by typing Control Panel in the search bar at the bottom of your screen.
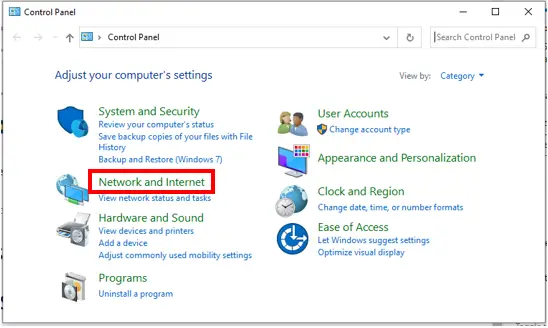
From there you will want to select Network and Internet.
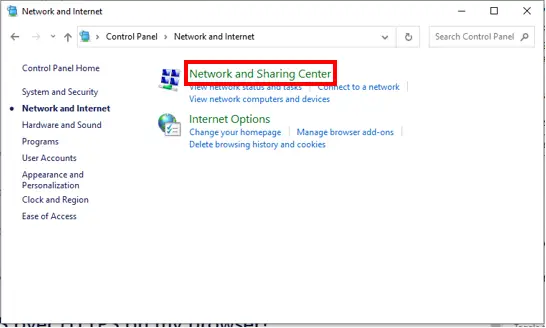
In the next window select Network and Sharing Center
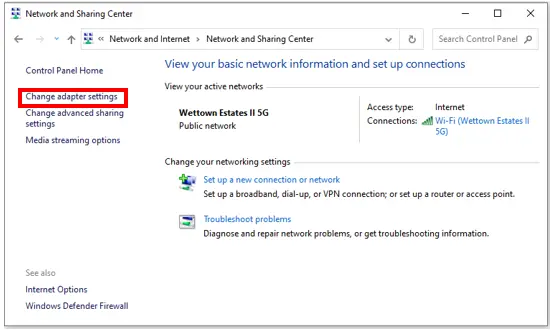
On the next window select Change adapter settings.
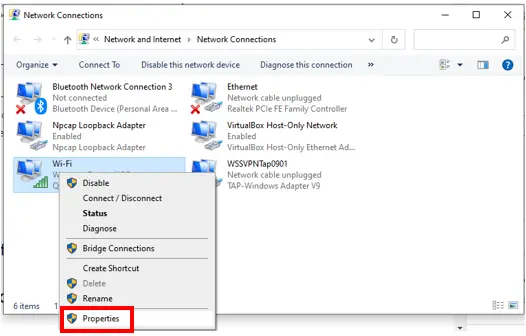
On the next window that opens, right-click the adapter that you are currently using to connect to the internet. For example, if you are connected to the internet over WiFi, right-click Wi-Fi and select Properties.
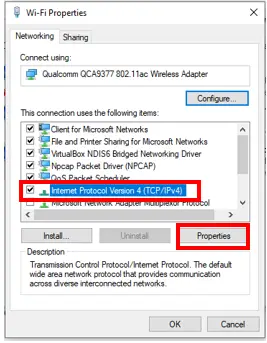
On the window that opens select Internet Protocol Version 4 and click Properties.
Now select Use the following DNS server addresses. In the Preferred DNS server and Alternate DNS server fields, enter the primary and secondary IP addresses of the DNS you would like to use. Then press OK.

At this point, every time you are connected to the internet over WiFi you will use the DNS that you just entered.
With some of your devices like your laptop, you may connect to the internet with a wireless (WiFi) or wired (ethernet) connection depending upon the situation. In this case you will want to switch the DNS for your ethernet adapter as well.
If you want to use the same DNS when you are on an ethernet connection, you will need to repeat the above steps for your Ethernet adapter. Your ethernet adapter can be selected from the network connections window.

Once you have changed the DNS for your ethernet and WiFi adapters, your computer will use these DNS however it is connected.
How to change your phone’s DNS
It is easier and faster to change the DNS on your phone than on your computer. Also, because phones can only connect to the internet over WiFi, you only need to change one adapter setting.
Let’s get started. I will show you the steps to change your DNS on an iPhone, but if you have an Android there are many other sites detailing steps to change your DNS.
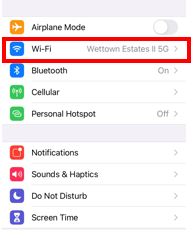
On an iPhone, you first need to go into the Settings menu. In the Settings menu, select Wi-Fi.
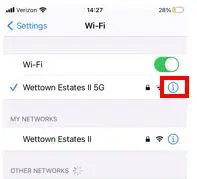
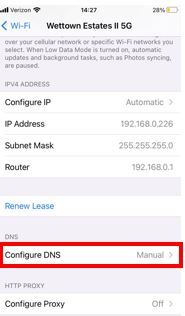
Next tap the information button next to the internet network you are currently connected to.
On the next screen select Configure DNS.
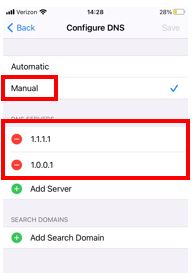
In the next screen, select Manual instead of Automatic. Then enter the primary and secondary IP address of the DNS you want to use. Make sure you delete the IP address of your router. That way, the only IP addresses listed are the primary and secondary DNS of the public DNS you chose.
When you are done your screen will look something like this:
Now, whenever you connect your iPhone to a WiFi network, it will use the DNS you want. You should never have to change this setting again.
In addition, if you have an Android or Apple tablet, the steps to change your DNS will be very similar.
Doesn’t that give you peace of mind? I know it does for me.
How do I enable DoH on my browser?
Now that you have configured your devices to use the DNS you want, there is one last thing to do.
Assuming you chose a public DNS that has DoH enabled (this is in your best interest), you will need to make sure that your browser has DoH enabled as well.
The good news here is as long as you have Google Chrome version 83 or newer, DoH is enabled by default.
In addition if you have Mozilla Firefox (and are a United States resident), DoH has been enabled by default since February of 2020.
The bad news is if you have Safari, you are out of luck. Safari does not enable DoH by default. That means if you have an iPhone with Safari installed, there is not much you can do in terms of DoH. Your options are to write your own app, or enable DoH directly in an app if that feature is offered.
I wouldn’t want to do that either.
Personally, I would just download Firefox or Chrome on your phone and ditch Safari.
What we have learned about DNS
Congratulations! Now you should have all the information you need to start using a public DNS.
You will now be browsing the internet more privately, safely, and faster than before.
Hopefully you have learned:
- That changing to a public DNS will increase the privacy, security, and speed of your internet searches
- What the most popular public DNS are and if they support DoH
- How to test which DNS is best for your unique situation
- How to change the DNS on your router, phone, tablet, and computer
I hope this information has inspired you to take the few minutes to change your DNS.
If you go through the exercise of finding which DNS is best for you, I would love to hear about your results.
Let me know how much your DNS resolution speed increased by switching to a public DNS.
As always, feel free to reach out to me if you run into any problems or have any questions.
Good luck and happy surfing!
Leave a Reply